Setting up an
on-demand Minecraft server on AWS
—
a low-cost option for casual players
Published: 26th January 2022; Last updated: 26th January 2022
Contents
Preface
▲This blog post is an updated version of the post I published in 2020. Featured contents are:
- Minecraft 1.18.1
- Java 17
- Switch to a different EC2 instance family for a better performance
The old step-by-step guide is still valid and basically working. This revamped version contains updated code snippets, which will work for the currently latest Minecraft release (1.18 Caves & Cliffs Part II).
Disclaimer:
It is your responsibility to check the actual pricing of AWS services and stop your EC2 instance if it should not run. An instance running 24/7 can easily generate a bill of $40/mo. ...or more and AWS will charge your credit card without any limit!
I recommend to read this guide to the end before starting with the setup in parallel.
A Bookkeeper's Calculation (Updated)
▲
Costs and metrics for each AWS service can be looked up at AWS EC2 On-demand Pricing*. Note: pricing differs per region, select the correct one in the table.
For a rough calculation the following numbers** will suffice:
AWS: $11.64ct/hour (~ 0.10€) for an a1.xlarge EC2 instance (8GB RAM, 4 vCPU) on region eu-central-1 (Frankfurt)
Conventional hosting provider: 6.00€/month for 8GB RAM, 4 vCPU and 100GB SSD storage.
Break Even Point: 6.00€/10ct == 600ct/10ct = ~60h/month
Running the Minecraft server on AWS can save you money if you do not play (or keep the EC2 instance running!) more than 60h per month on a a1.xlarge instance. You can try out if other instance types are also sufficient for your server, changing the break even point for you (e.g. a t3.medium instance). For us, being usually 3 or 4 players, 4 vCPU cores gave us a nice performance boost: even if we were in different areas of the world or found many mobs around us, we experienced smooth gameplay. With the a1.xlarge instance we usually ended up with total costs of $1.60/month (which is 15h playing time + some cents for API calls to download plugins or backup the Minecraft server to the S3 bucket).
And remember: the first 12 months you may use the AWS free contingent: 5GB/month S3 storage, 30GB/month EBS volume and a t2.micro EC2 instance as well as a few thousand web requests.
*pricing: when you compare prices be aware that AWS pricelist shows you net prices.
**numbers: price per hour for running the server includes cost for a a1.xlarge EC2 instance and free tier contingent of EBS and S3 storage.
Requirements
▲
- An AWS account (requires a credit card).
- A terminal (Windows users can use git-bash or any other SSH client).
- Some basic unix command line knowledge.
- Knowledge about configuring and running a Minecraft server (will not be covered in this blog post).
Step by Step Guide
▲All configuration files mentioned in this guide can be found on GitHub.
Services (AWS Hardware)
- EC2 instance: a1.xlarge (8GB RAM, 4 vCPU, EBS storage attachable)
- EBS storage: 8GB (within 30GB/mo. free tier)
- S3 Bucket (within 5GB/mo. free tier) for server cold storage and backup purpose
Setup & Configuration
Log on to the AWS console and choose your region. All services need to be in the same region. Otherwise things might not work or generate extra cost for cross-region traffic. Also make sure that all services you create in the following steps are in the same Availability Zone (AZ) or subnet (e.g. eu-central-1a).
Create an S3 Instance
- Give it a globally unique name (will be needed later for the policy).
- Create three directories
backup,mc-serverandsetup. - Upload your Minecraft server files into the folder
mc-server(using the S3 web interface or the aws cli). In this example the mc-server.jar file is namedpaper-current.jar. - Create a file named
minecraft.servicewith following content and upload it to thesetupfolder:
[Unit]
Description=Minecraft Service
Wants=network.target
After=network.target

[Service]
Type=simple
User=ec2-user
WorkingDirectory=/minecraft/mc-server
ExecStart=/usr/bin/java -Xms6G -Xmx6G -jar paper-current.jar --nogui

[Install]
WantedBy=multi-user.target
Note: if you decided to do the initial setup/PoC with the free-tier t2.micro instance, you should create a copy of the service file named
minecraft512.service and adjust the Java heap flags accordingly (-Xms512M -Xmx512M). In further config/scripts use this minecraft512.service file instead of the mentioned minecraft.service. Don't forget to change it later if you intend to play on your server.Create an IAM Policy and Role
An IAM (Identity and Access Management) role is required for upcoming configuration steps:
- Click on Policies, Create Policy
- Select the JSON editor tab in the UI and paste the following configuration and replace
<s3-bucket-name>with your S3 bucket's name: - Click Next: Tags
- Click Next: Review
- Click Review Policy
- Give your policy a name and optionally a description.
- Click Create Policy Back in the IAM dashboard:
- Click on Roles, Create Role
- Select use case: EC2
- Click Next: Permissions
- Select your previously created Policy to attach it to your IAM Role.
- Give your role a name and optionally a description.
- Check that your policy is attached to the role.
- Click Create Role Double check that everything is set up correctly:
- Go back to the IAM dashboard, click on the Policies section.
- Search for the policy you just created.
- Make sure the policy is used (the table should list that your policy is used as "Permissions policy", instead of "None").
{
  "Version": "2012-10-17",
  "Statement": [
    {
        "Effect": "Allow",
        "Action": ["s3:ListBucket"],
        "Resource": ["arn:aws:s3:::<s3-bucket-name>"]
    },
    {
        "Effect": "Allow",
        "Action": [
        "s3:ListBucket",
        "s3:GetObject",
        "s3:GetBucketLocation",
        "s3:PutObject",
        "s3:PutObjectAcl",
        "s3:DeleteObject"
        ],
        "Resource": ["arn:aws:s3:::<s3-bucket-name>/*"]
    }
  ]
}
Create an EC2 Instance
Create an EC2 (Elastic Compute Cloud) instance (for initial setup and tryout use t2.micro, for production a1.xlarge).
To create an instance click on Start Instance and follow the wizard:
- Select an Amazon Machine Image (AMI) of type "Amazon Linux 2 AMI (HVM), SSD Volume Type, 64-bit (Arm)".
- Select an Instance Type (t2.micro is only available if you selected the x86 image, a1.xlarge is available as ARM image) and click on Next: Configure Instance Details.
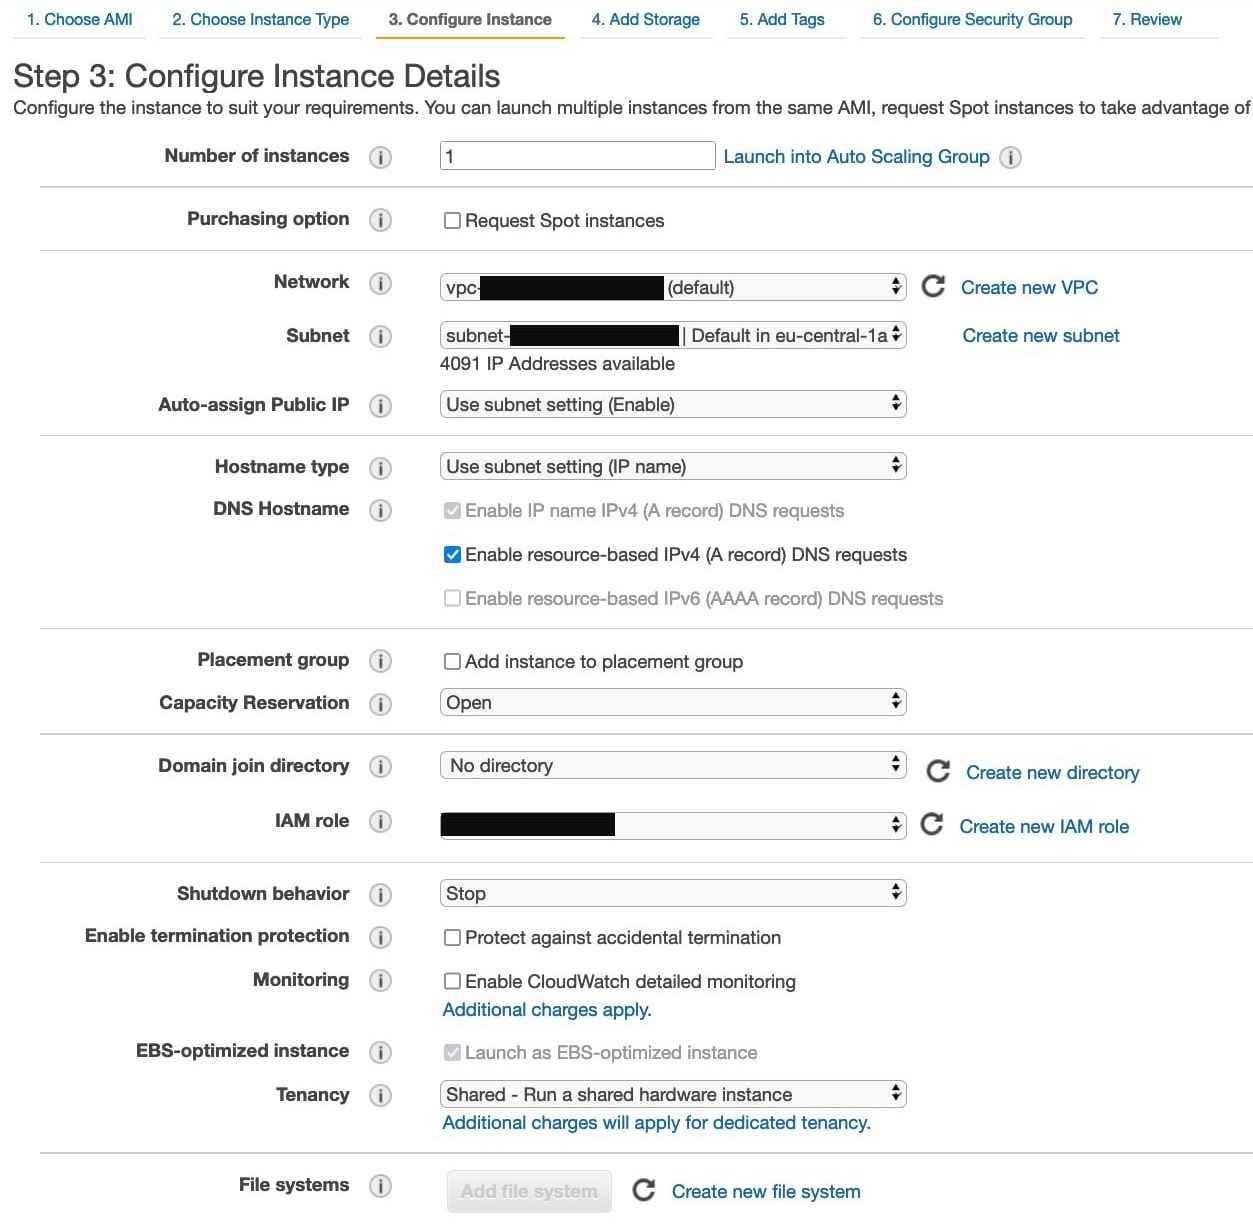
- Choose your settings as depicted here:
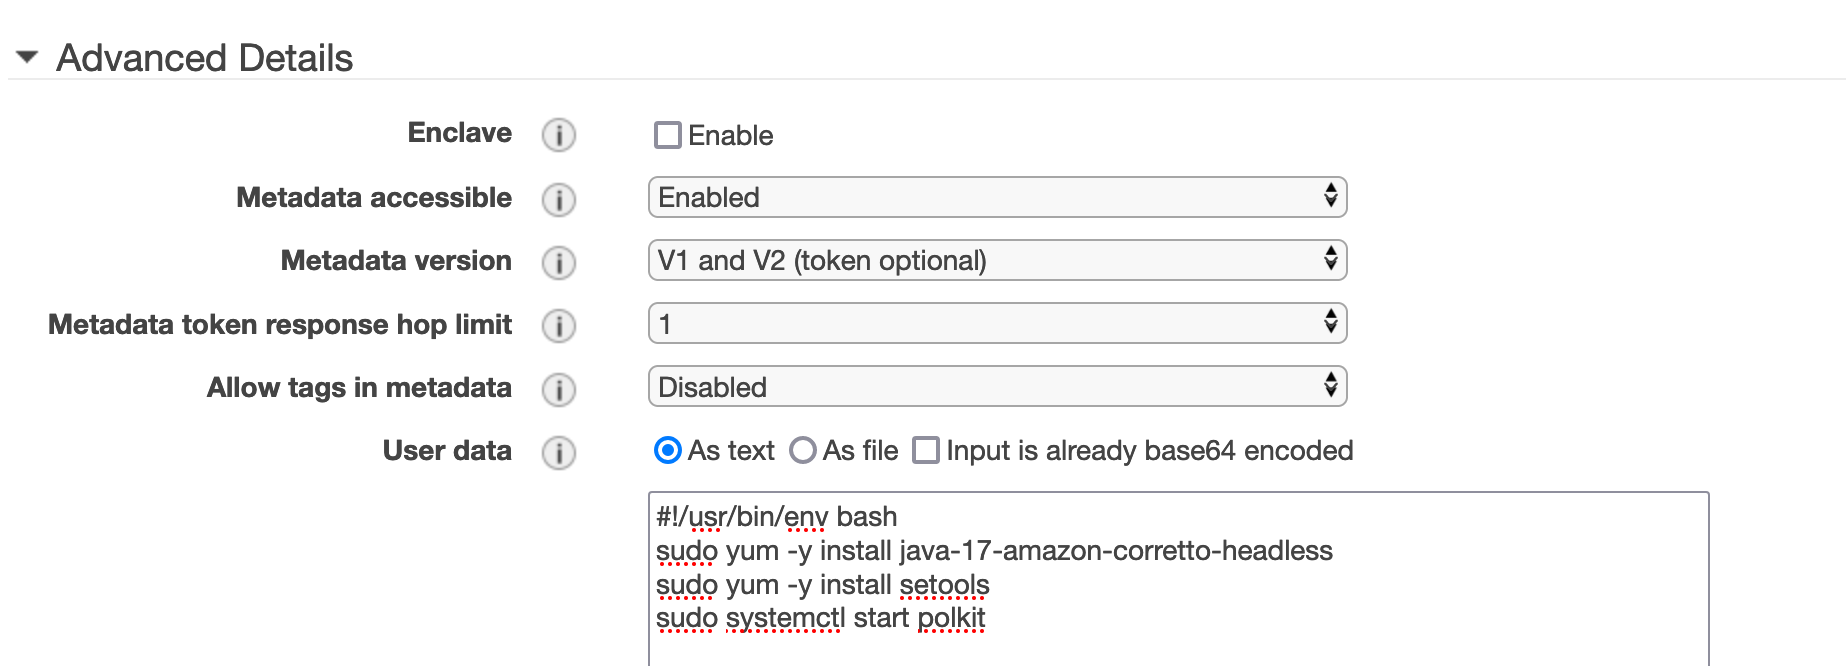
- Scroll down to the section "Advanced Details"
- Copy the following script into the textarea "User data" (type: As text):
- Click Next: Add Storage
- An EC2 instance needs an EBS volume attached.
Create one by adding it to the EC2 instance (8GB should suffice).
Make sure the "Delete on Termination" checkbox is UNchecked! - Click Next: Add Tags
- Click Next: Configure Security Group
- Create a new security group, give it a name and configure it to your (and minecraft's) needs. Here's an example:
- Click Review and Launch
- Check your configuration by going through this list again and compare to the overview. If everything is ok:
- Click Launch
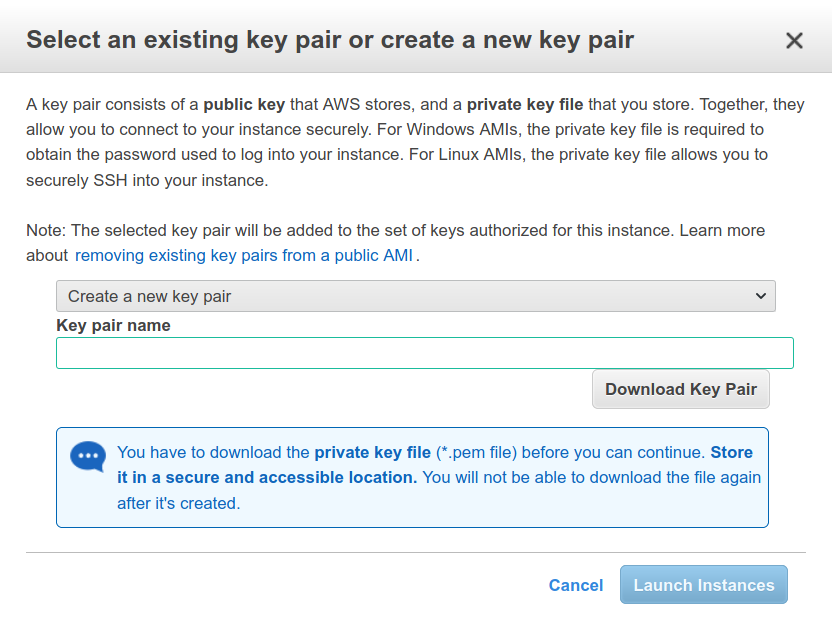
- You will be asked to create a key pair or select an existing one. Please refer to the next section Key Pairs:

Make sure to select the same AZ (e.g. eu-central-1a) where you create the EBS volume.
Assign your IAM role.
#!/usr/bin/env bash
# install java 17 according to https://docs.aws.amazon.com/corretto/latest/corretto-17-ug/amazon-linux-install.html
sudo yum -y install java-17-amazon-corretto-headless
sudo yum -y install setools
sudo systemctl start polkit

# minecraft
sudo mkdir /minecraft
sudo mkdir /minecraft/mc-server
cd /minecraft
# for initial configuration enable copy from S3 cold storage to empty EBS:
aws s3 cp --recursive s3://<s3-bucket-name>/mc-server/ mc-server/
sudo chown -R ec2-user:ec2-user /minecraft

# systemd service
sudo aws s3 cp s3://<s3-bucket-name>/setup/minecraft.service /etc/systemd/system
sudo systemctl daemon-reload
sudo systemctl enable minecraft
sudo systemctl start minecraft


Key Pairs
- Create a key pair according to the official AWS documentation. Alternatively you may do this as the final step when launching a new EC2 instance.
- Save the .pem file to your computer. Note: it's your private key. Everyone who has access to this key file has access to your instance. So do not share it via E-Mail, Cloud Drive, etc. without encryption!

Optional: Attach an existing EBS to an EC2 Instance
- Create an EC2 instance (with default EBS). It must be in the same AZ as the EBS you plan to attach to it.
- Stop the EC2 instance.
- Detach the default EBS from the EC2 instance and delete it.
- Attach your existing EBS (with mc-server on it) to the EC2 instance as
/dev/xvda.
Clean-Up: Disable Initial Setup Config of EC2 Instance
- Stop your EC2 instance if it's running.
- Select the instance and go to
Actions > Instance Settings > Edit user data - Switch to this configuration (replace
<s3-bucket-name>) and click Save.
#!/usr/bin/env bash
# install java 17 according to https://docs.aws.amazon.com/corretto/latest/corretto-17-ug/amazon-linux-install.html
sudo yum -y install java-17-amazon-corretto-headless
sudo yum -y install setools
sudo systemctl start polkit

# minecraft
sudo mkdir /minecraft
sudo mkdir /minecraft/mc-server
cd /minecraft
# copy disabled, as we do not want to overwrite EBS with old version from S3 every time:
#aws s3 cp --recursive s3://<s3-bucket-name>/mc-server/ mc-server/
sudo chown -R ec2-user:ec2-user /minecraft

# systemd service
sudo aws s3 cp s3://<s3-bucket-name>/setup/minecraft.service /etc/systemd/system
sudo systemctl daemon-reload
sudo systemctl enable minecraft
sudo systemctl start minecraft
Setting Up a CloudWatch Alarm
▲Check the instructions in the old guide, they should still work.
Operating your EC2 Instance
▲
- Download & install the aws cli.
- Getting information about your instances:
$ aws ec2 describe-instances
$ aws ec2 start-instances --instance-ids <INSTANCE_ID>
$ ssh -i <private-key.pem> e2c-user@<ec2-public-ip-address>
$ aws ec2 stop-instances --instance-ids <INSTANCE_ID>
jq or grep.Operating your Minecraft Server
▲Note: generally, the Minecraft server will automatically start up, when you start your EC2 instance. For manually operating your server (restarting it or looking at the logs) you need to use a ssh tunnel.
- Connect to your EC2 instance using ssh (see previous section)
- Starting your Minecraft server:
$ sudo systemctl start minecraft
$ systemctl status minecraft
$ cd /minecraft/mc-server
$ tail -f logs/latest.log
$ sudo systemctl stop minecraft
paper-current.jar file.
$ wget https://papermc.io/api/v2/projects/paper/versions/1.18.1/builds/176/downloads/paper-1.18.1-176.jar -O paper-1.18.1-latest.jar
$ cp paper-1.18.1-latest.jar paper-current.jar
$ touch /minecraft/mc-server.tar && rm -v /minecraft/mc-server.tar && tar cf /minecraft/mc-server.tar /minecraft/mc-server && aws s3 cp /minecraft/mc-server.tar s3://<s3-bucket-name>/backup/$(date '+%Y-%m-%d')/
Trouble Shooting
▲If something does not work, be patient, read the guide again (carefully!, step by step!) and compare to your configuration. It might be that you have a typo in one of your file names or in the place where you reference the files by name (e.g. minecraft512.service instead of minecraft.service in the user_data script).
Conclusion
▲
If you want to run your own Minecraft server and only play every now and then, AWS is the perfect place to go. If you want to run a server 24/7 it is too expensive and you better go for a conventional VM hosting provider.
You can find all configuration files mentioned in this guide on GitHub. If my blog article helped you in setting up your own Minecraft server on AWS, I'd be glad if you would leave me a ★ Star on the GitHub repository. If you notice any gap in this guide or something has changed, open an issue there. Don't expect an immediate answer, but I might update this guide when I find the time.
Excursion: our Minecraft Server
To make use of the EC2 instance's full power, we do not run a vanilla server, but have chosen to go for PaperMC as it is "compatible with Spigot plugins and offering uncompromising performance". We strongly recommend it, they're also fast with updates (only few days to weeks behind public Minecraft releases).
Have fun!

To the top ▲