How to run a
cost-efficient Minecraft server on AWS
a step by step guide
Published: 15th October 2020; Last updated: 27th November 2020
Read the updated 2022 version of this post!
Contents
Preface
▲
This project was born in spring 2020, during the COVID-19 social distancing and self-isolation period.
Many of us might have asked themselves what to do during lockdown? To me, one answer was playing Minecraft! But playing alone is boring, so you want to see (or at least hear) your friends. This means you need to play Minecraft on a server. Luckily we had a backup of our old world, which we started playing back in 2013 (or even 2011?). Now the question was, where would we host it? On a PC and open up my router's ports/firewall? Bad idea. So we looked for a not too expensive hosting service. But the cheapest we could find for the amount of hardware resources we needed was still 6.00€ per month. And as we are grown up boys already bound in a 40h working week, we knew we wouldn't have time to play a lot... Maybe five or six hours in total in an average month. So I asked myself "Is there a way to run a Minecraft server in a cost-efficient pay-per-use scenario?" And the answer is "AWS!".
Disclaimer:
I am not liable for any unexpected costs you might be billed by AWS. It is your responsibility to check the actual pricing and stop your instance if it should not run. An instance running 24/7 can easily generate a bill of $40/mo. ...or more and AWS will charge your credit card without any limit! I strongly suggest to make use of CloudWatch Alarms! You've been warned.
I recommend to read this guide to the end before starting with the setup in parallel.
A Bookkeeper's Calculation
▲
Since it's almost half a year when I first made up my mind about costs for running a Minecraft server on AWS, I do not have the detailed costs and metrics for each AWS service in mind anymore, but they can be looked up at AWS EC2 On-demand Pricing*. Note: pricing differs per region, select the correct one in the table.
For a rough calculation the following numbers** will suffice:
AWS: $5.712ct/hour (~ 0.052€) for a t3.medium EC2 instance (4GB RAM, 2 vCPU) on region eu-central-1 (Frankfurt)
Conventional hosting provider: 6.00€/month for 8GB RAM, 4 vCPU and 100GB SSD storage.
Break Even Point: 6.00€/5.2ct == 600ct/5.2ct = ~115h/month
Running the Minecraft server on AWS can save you money if you do not play (or keep the EC2 instance running!) more than 115h per month. That's a lot! From experience we never paid more than $1.00/month (which is 15h + some cents for API calls to download plugins or backup the Minecraft server to the S3 bucket). In July, August and September we didn't play at all, so the bill was $0.00 - saving us 18 bucks this summer.
And remember: the first 12 months you may use the AWS free contingent: 5GB/month S3 storage, 30GB/month EBS volume and a t2.micro EC2 instance as well as a few thousand web requests.
*pricing: when you compare prices be aware that AWS pricelist shows you net prices.
**numbers: price per hour for running the server includes cost for a t3.medium EC2 instance and free tier contingent of EBS and S3 storage.
Requirements
▲
- An AWS account (requires a credit card).
- A terminal (Windows users can use git-bash or any other SSH client).
- Some basic unix command line knowledge.
- Knowledge about configuring and running a Minecraft server (will not be covered in this blog post).
Step by Step Guide
▲All configuration files mentioned in this guide can be found on GitHub.
Services (AWS Hardware)
- EC2 instance: t3.medium (4GB RAM, 2 vCPU, EBS storage attachable)
- EBS storage: 10GB (within 30GB/mo. free tier)
- S3 Bucket (within 5GB/mo. free tier) for server cold storage and backup purpose
Setup & Configuration
Log on to the AWS console and choose your region. All services need to be in the same region. Otherwise things might not work or generate extra cost for cross-region traffic. Also make sure that all services you create in the following steps are in the same Availability Zone (AZ) or subnet (e.g. eu-central-1a).
Create an S3 Instance
- Give it a globally unique name (will be needed later for the policy).
- Create three directories
backup,mc-serverandsetup. - Upload your Minecraft server files into the folder
mc-server(using the S3 web interface or the aws cli). In this example the mc-server.jar file is namedpaper-current.jar. - Create a file named
minecraft.servicewith following content and upload it to thesetupfolder:
[Unit]
Description=Minecraft Service
Wants=network.target
After=network.target

[Service]
Type=simple
User=ec2-user
WorkingDirectory=/minecraft/mc-server
ExecStart=/usr/bin/java -Xms3584M -Xmx3584M -XX:+UseConcMarkSweepGC -jar paper-current.jar nogui

[Install]
WantedBy=multi-user.target
Note: if you decided to do the initial setup/PoC with the free-tier t2.micro instance, you should create a copy of the service file named
minecraft512.service and adjust the Java heap flags accordingly (-Xms512M -Xmx512M). In further config/scripts use this minecraft512.service file instead of the mentioned minecraft.service. Don't forget to change it later if you intend to play on your server.
Optional: Create an EBS Volume
An EBS (Elastic Block Store) volume can be created under the EC2 section in the AWS console.
I suggest to do this during the creation of the EC2 instance and skip this section for now.
Otherwise continue here:
Create a new volume and follow the wizard:
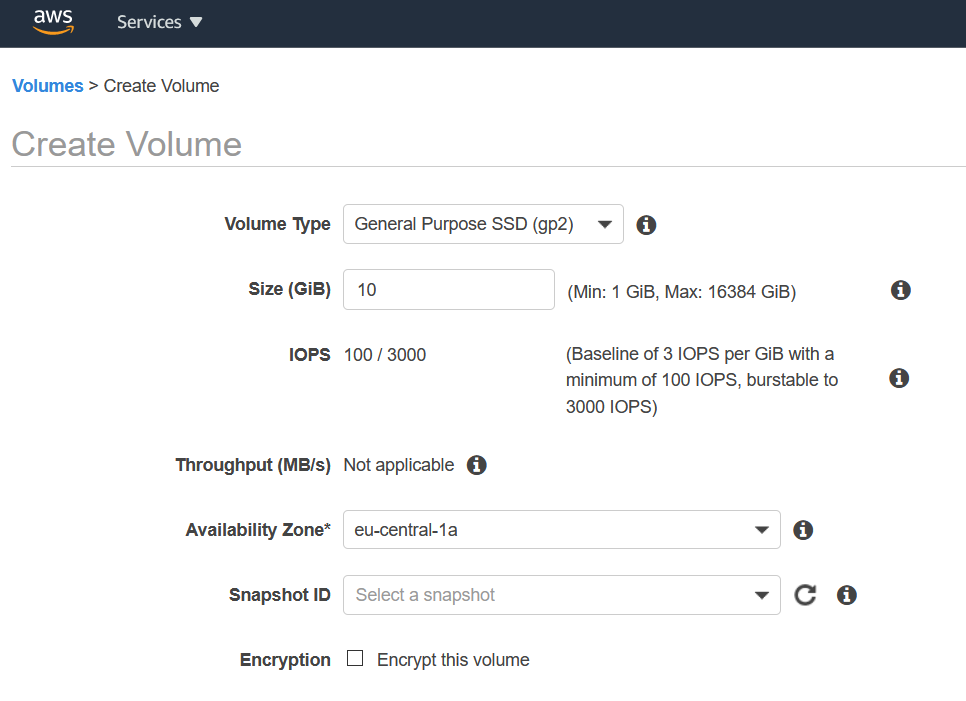
10GB should be sufficient. Choose your AZ.
Create an IAM Role
An IAM (Identity and Access Management) role is required for upcoming configuration steps.
Click Create Role and configure it accordingly:
- Select Type: EC2
- Click Next
- Click Create Policy
- Select the JSON editor and paste the following configuration and replace
<s3-bucket-name>with your S3 bucket's name: - Click Check Policy
- Give your policy a name and optionally a description.
- Click Create Policy
- Select your created Policy to assign it to your IAM Role.
- Click Next: Tags
- Click Next: Check
- Give your role a name and optionally a description.
- Check that your policy is assigned to the role.
- Click Create Role
{
  "Version": "2012-10-17",
  "Statement": [
    {
        "Effect": "Allow",
        "Action": ["s3:ListBucket"],
        "Resource": ["arn:aws:s3:::<s3-bucket-name>"]
    },
    {
        "Effect": "Allow",
        "Action": [
        "s3:ListBucket",
        "s3:GetObject",
        "s3:GetBucketLocation",
        "s3:PutObject",
        "s3:PutObjectAcl",
        "s3:DeleteObject"
        ],
        "Resource": ["arn:aws:s3:::<s3-bucket-name>/*"]
    }
  ]
}
Create an EC2 Instance
Create an EC2 (Elastic Compute Cloud) instance (for initial setup and tryout use t2.micro, for production t3.medium).
To create an instance click on Start Instance and follow the wizard:
- Select an Amazon Machine Image (AMI) of type "Amazon Linux 2 AMI (HVM), SSD Volume Type, 64-bit (x86)".
- Select an Instance Type (t2.micro or t3.medium) and click on Next: Configure Instance Details.
- Choose your settings as depicted here:
- Scroll down to the section "Advanced Details"
- Copy the following script into the textarea "User data" (type: As text):
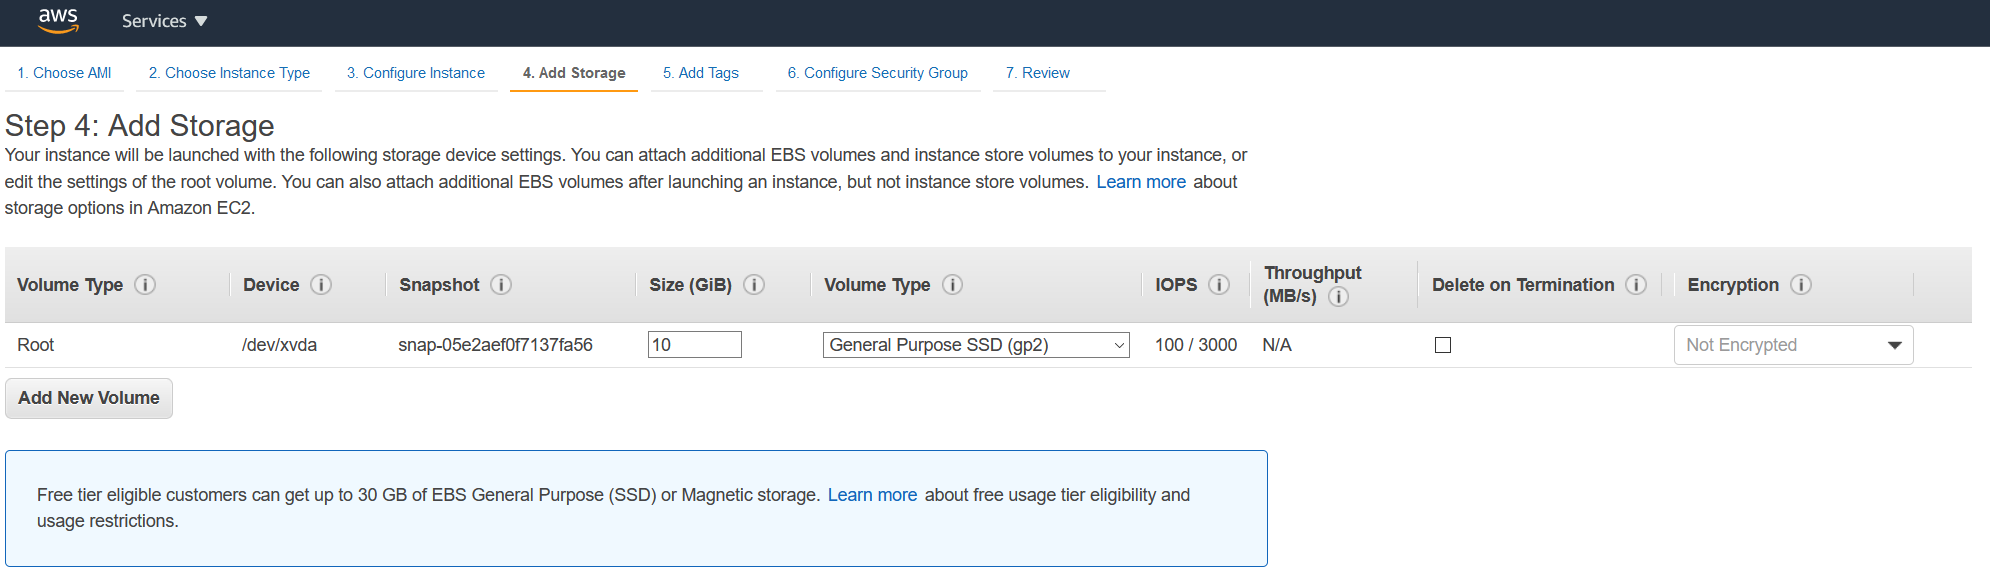
- Click Next: Add Storage
- An EC2 instance needs a EBS volume attached.
Create one by adding it to the EC2 instance.
Make sure the "Delete on Termination" checkbox is UNchecked! - Click Next: Add Tags
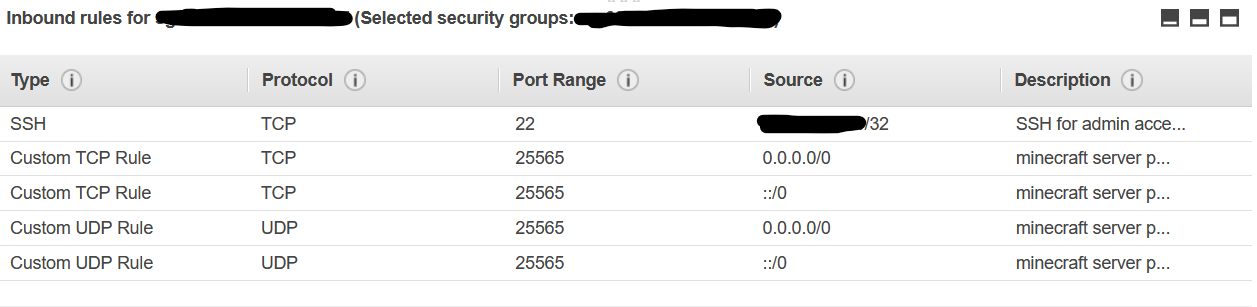
- Click Next: Configure Security Group
- Create a new security group, give it a name and configure it to your (and minecraft's) needs. Here's an example:
- Click Review and Launch
- Check your configuration by going through this list again and compare to the overview. If everything is ok:
- Click Launch
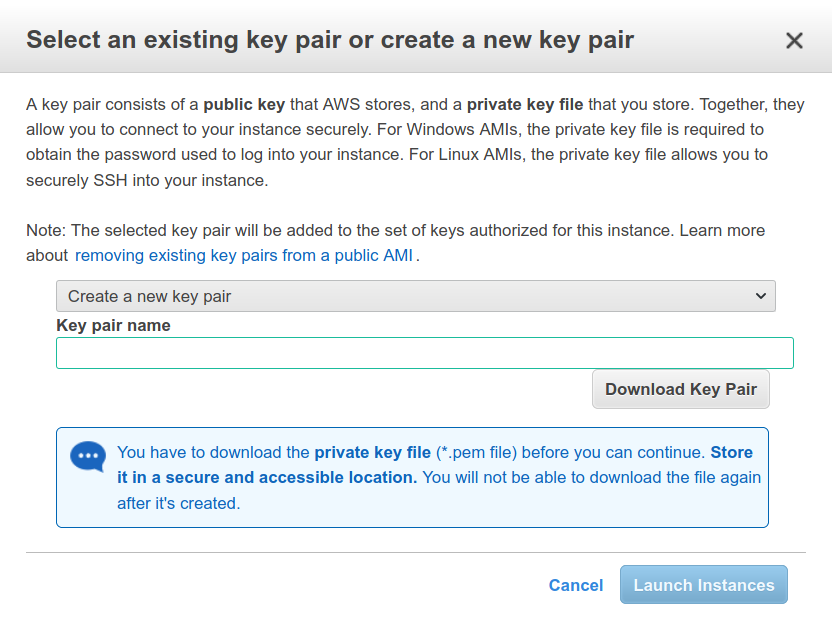
- You will be asked to create a key pair or select an existing one. Please refer to the next section Key Pairs:
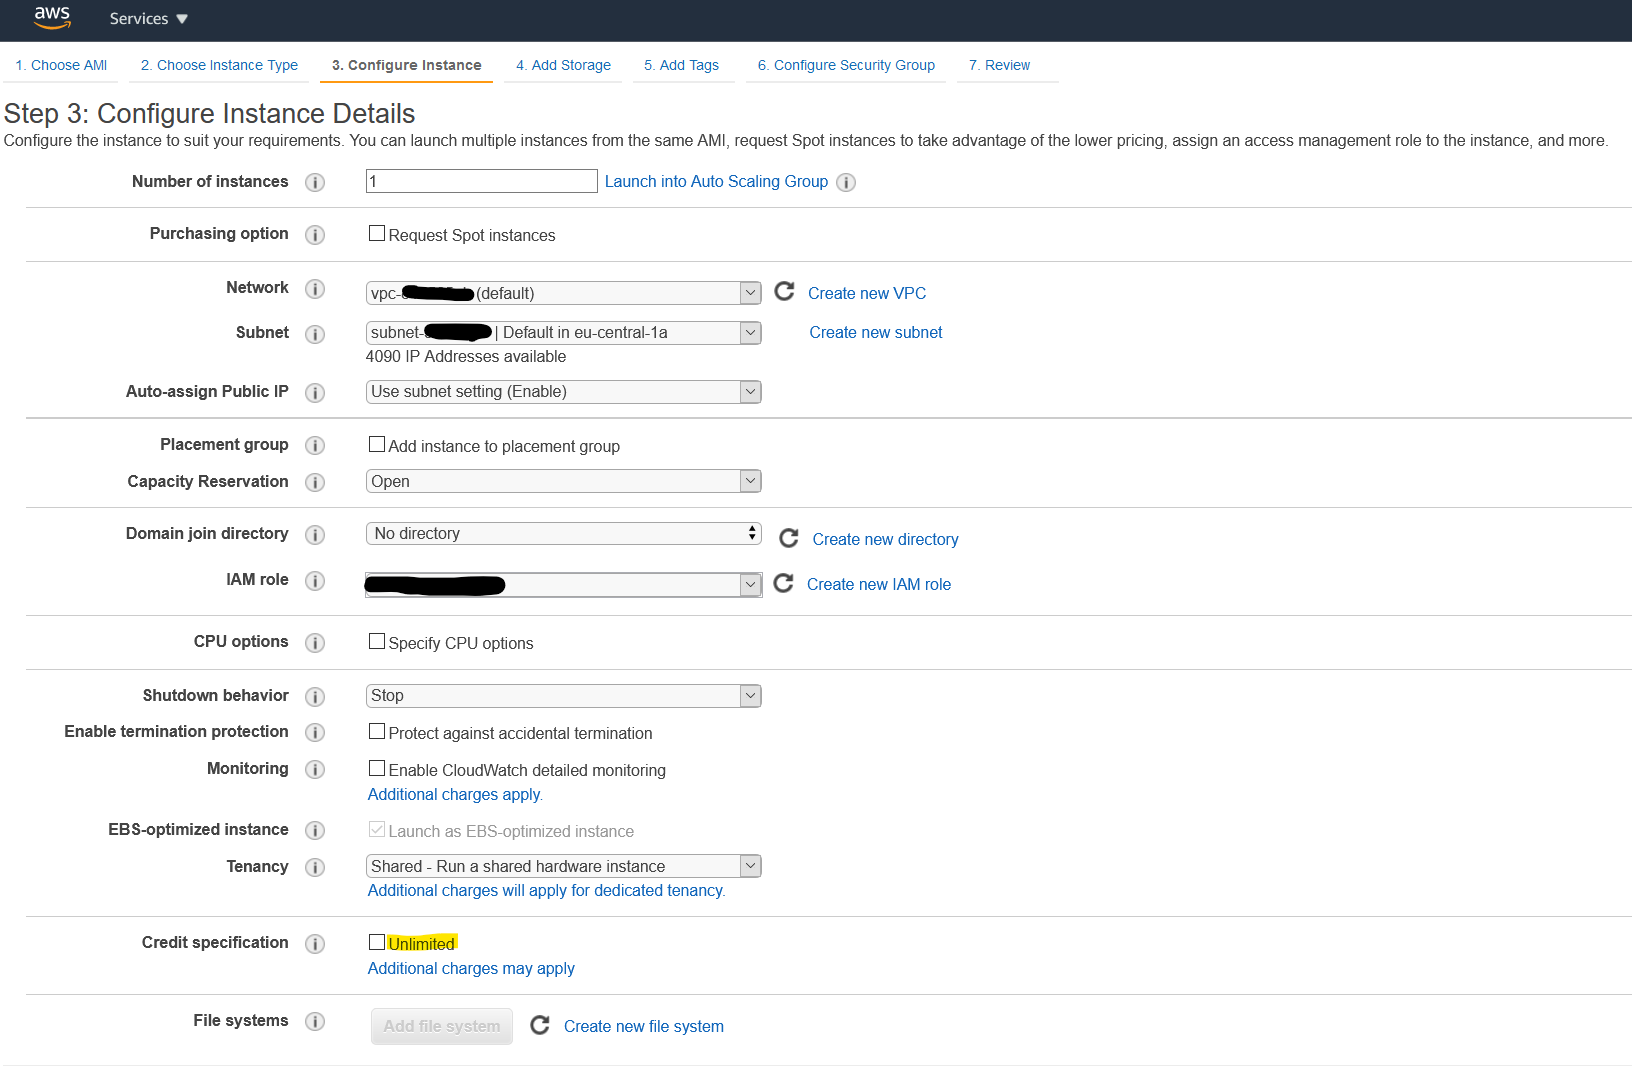
Make sure to select the same AZ (e.g. eu-central-1a) where you created the EBS volume.
Assign your IAM role.
UNcheck the checkbox "Credit Specification: Unlimited".
#!/usr/bin/env bash
sudo yum -y install java-1.8.0
sudo yum -y install setools
sudo systemctl start polkit

# minecraft
sudo mkdir /minecraft
sudo mkdir /minecraft/mc-server
cd /minecraft
# for initial configuration enable copy from S3 cold storage to empty EBS:
aws s3 cp --recursive s3://<s3-bucket-name>/mc-server/ mc-server/
sudo chown -R ec2-user:ec2-user /minecraft

# systemd service
sudo aws s3 cp s3://<s3-bucket-name>/setup/minecraft.service /etc/systemd/system
sudo systemctl daemon-reload
sudo systemctl enable minecraft
sudo systemctl start minecraft

Key Pairs
- Create a key pair according to the official AWS documentation. Alternatively you may do this as the final step when launching a new EC2 instance.
- Save the .pem file to your computer. Note: it's your private key. Everyone who has access to this key file has access to your instance. So do not share it via E-Mail, Cloud Drive, etc. without encryption!
Optional: Attach an existing EBS to an EC2 Instance
- Create an EC2 instance (with default EBS).
- Stop the EC2 instance.
- Detach the default EBS from the EC2 instance and delete it.
- Attach your existing EBS (with mc-server on it) to the EC2 instance as
/dev/xvda.
Clean-Up: Disable Initial Setup Config of EC2 Instance
- Stop your EC2 instance if it's running.
- Select the instance and go to
Actions > Instance Settings > Edit user data - Switch to this configuration (replace
<s3-bucket-name>) and click Save.
#!/usr/bin/env bash
sudo yum -y install java-1.8.0
sudo yum -y install setools
sudo systemctl start polkit

# minecraft
sudo mkdir /minecraft
sudo mkdir /minecraft/mc-server
cd /minecraft
# copy disabled, as we attach existing EBS:
#aws s3 cp --recursive s3://<s3-bucket-name>/mc-server/ mc-server/
sudo chown -R ec2-user:ec2-user /minecraft

# systemd service
sudo aws s3 cp s3://<s3-bucket-name>/setup/minecraft.service /etc/systemd/system
sudo systemctl daemon-reload
sudo systemctl enable minecraft
sudo systemctl start minecraft
Setting Up a CloudWatch Alarm
▲
You can use Amazon CloudWatch Alarms to get notified or take automated action if certain metric thresholds are exceeded. In free tier, 10 alarms are free of charge (pricing).
I suggest to configure an alarm for your EC2 instance that will notify you via E-Mail if it is running for longer than 18 hours and automatically shut it down to avoid further costs. To do so, follow these steps:
- Stop your EC2 instance if it's running.
- Open the CloudWatch console an go to Alarms.
- Click Create alarm
- Click Select metric
- Select metrics for EC2 > Per-Instance Metrics.
- Select the metric CPUUtilization for your EC2 instance.
- Click Select metric
- In the next section, specify the metric and conditions:
- Do NOT change the fields Metric name or InstanceId. Otherwise your alarm will not work.
- For the field Statistic choose "Sample count".
- Set the period to 1 hour.
- Threshold type: "Static"
- Whenever "CPUUtilization" is greater than
0. - Additional configuration:
- Datapoints to alarm: 18 out of 24 (EC2 instance is running for more than 18 hours a day).
- Treat missing data as missing.
- Now configure actions if the alarm is fired:
- Set up a notification if the state is "In alarm". You might need to create a "topic" and specify an E-Mail address.
- EC2 Action: If "In alarm" --> "Stop this instance".
- Give your alarm a name, and optionally a description what actions will be triggered.
- Review your configuration and click Create alarm
For more information read the official AWS documentation on Alarm Actions.
Additionally you can also define a Billing Alarm.
Operating your EC2 Instance
▲
- Download & install the aws cli.
- Getting information about your instances:
$ aws ec2 describe-instances
$ aws ec2 start-instances --instance-ids <INSTANCE_ID>
$ ssh -i <private-key.pem> e2c-user@<ec2-public-ip-address>
$ aws ec2 stop-instances --instance-ids <INSTANCE_ID>
jq or grep.Operating your Minecraft Server
▲Note: generally, the Minecraft server will automatically start up, when you start your EC2 instance. For manually operating your server (restarting it or looking at the logs) you need to use a ssh tunnel.
- Connect to your EC2 instance using ssh (see previous section)
- Starting your Minecraft server:
$ sudo systemctl start minecraft
$ systemctl status minecraft
$ cd /minecraft/mc-server
$ tail -f logs/latest.log
$ sudo systemctl stop minecraft
$ wget https://papermc.io/api/v1/paper/1.15.2/latest/download -O paper-1.15.2-latest.jar
$ cp paper-1.15.2-latest.jar paper-current.jar
$ aws s3 cp --recursive /minecraft/mc-server s3://<s3-bucket-name>/backup/$(date '+%Y-%m-%d')/mc-server
Trouble Shooting
▲If something does not work, be patient, read the guide again (carefully!, step by step!) and compare to your configuration. It might be that you have a typo in one of your file names or in the place where you reference the files by name (e.g. minecraft512.service instead of minecraft.service in the user_data script).
AWS Pricing Model
▲Understanding the pricing model of AWS is not easy. But contacting the billing support can really help. I got a bill where I was charged 20ct for API calls of which I thought they were free. After submitting a ticket, I got a call from Seattle and a friendly woman explained me in detail where the costs come from, told me that there is a difference between API calls inside AWS and the requests that go out to the internet and patiently answered many more of my questions. Afterwards I received a summary via E-Mail with detailed answers about all the questions I had. If you cannot explain a bill, just contact the billing support. And always have a look at the AWS Billing Dashboard (or the Cost Explorer) which you can find on the AWS console.
Conclusion
▲
If you want to run your own Minecraft server and only play every now and then, AWS is the perfect place to go. If you want to run a server 24/7 it is too expensive and you better go for a conventional VM hosting provider.
You can find all configuration files mentioned in this guide on GitHub. If my blog article helped you in setting up your own Minecraft server on AWS, I'd be glad if you would leave me a ★ Star on the GitHub repository. If you notice any gap in this guide or something has changed, open an issue there. Don't expect an immediate answer, but I might update this guide when I find the time.
Excursion: our Minecraft Server
To make use of the EC2 instance's full power, we do not run a vanilla server, but have chosen to go for PAPERMC as it is "compatible with Spigot plugins and offering uncompromising performance". We strongly recommend it, they're also fast with updates (only few days to weeks behind public Minecraft releases).
Have fun!

To the top ▲